Egg Carton Bowls – How to
Delve into the enchanting world of paper mache and transform ordinary egg cartons into extraordinary works of art! In this blog post, I will guide you through the process of creating charming paper mache bowls that will add a touch of magic to your home decor. Get ready to unleash your creativity and explore the endless possibilities of this delightful craft. From selecting the perfect egg cartons to mixing the paste and sculpting your masterpiece, every step is an opportunity to infuse your creation with your unique style and flair. So grab your supplies, let your imagination soar, and embark on a crafting adventure that is sure to inspire and delight!

To begin your project, select the egg cartons that will serve as the foundation for your bowls. These humble cartons will soon be shaped and moulded into charming bowls that are as functional as they are visually appealing. I used x2 12 egg cartons, plus one 6 egg carton to make three cereal sized bowls.

Tear the egg cartons into small pieces. Put into a large bowl and cover with water. Leave to soak for about two-three hours.

Then use a food blender to blend the soaked cartons to a pulp. The water then needs to be squeezed out, so I created balls as I squeezed. Then mush them together to gradually create a dough. Next, prepare your paste mixture!

Combine the dough with a handful of plain flour, a sprinkle of salt, some pva glue and a squirt of washing up liquid. Create a soft pliable dough, which stays moulded when you want it to. Always add a bit of water if the mixture is too dry.

Put some plastic clingfilm into your chosen bowls, or use a plastic bag as I did. Press the mache into your bowls. As you sculpt and mould your paper mache bowls, let your creativity guide your hands, allowing each curve and shape to reflect your individual style and personality.
With each step of the crafting process, you have the opportunity to infuse your creation with a bit of magic and wonder. Whether you opt for a simple design or a more intricate pattern, each bowl will be a testament to your artistic vision and skill.

Then comes some patience. The bowls will take a while to dry. When you think the structure is safe enough to do so, lift the mould out of the bowls and remove the plastic. Pop them onto a wire cooling rack to allow the air to circulate and speed up the drying. Depending on the humidity, this may take a week.

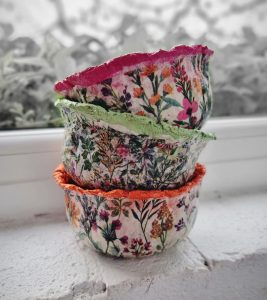
When they are completely dry, trim the edges with scissors. Take your chosen method of decoration and go! I used some pretty napkins and coordinating paint to decorate mine. I then sealed with some Gloss Medium, or you could use pva glue.

So, gather your supplies, clear a workspace, and let your imagination take flight as you embark on this delightful crafting adventure. Get ready to experience the joy of transforming everyday materials into something truly extraordinary, and prepare to showcase your paper mache bowls with pride in your home. Let the magic of crafting inspire you and bring a touch of whimsy to your surroundings.